vendredi 4 avril 2014
SquidGard FATAL: Error db_open: No such file or directory
cd /var/lib/squidguard/db
rsync -arpogvt rsync://ftp.ut-capitole.fr/blacklist .
mv -fv dest/* .
rm -rf /var/lib/squidguard/db/dest/
chown -R proxy:proxy /var/lib/squidguard/
# verify
squidGuard -d
# that's all !
KVM and virsh essential command
LVM KVM to Virtualbox
#----------------------------------------------------------------
# change @MAC
virsh edit
# Copy VM script bash
#--------------------------------------------------------------------------------------------------------------------------------------------
#!/bin/bash
activevm="$1"
targetpath=/home/kvm
remote=edouard
localvmsource=$(virsh dumpxml $activevm | grep 'source dev=' | cut -d "'" -f2)
remotevmd=$(ssh root@$remote "virsh dumpxml $activevm | grep 'source dev=' ")
remotevmdest=$(echo "$remotevmd" | grep 'source dev=' | cut -d "'" -f2)
lvmsize=$(lvs | sed -n "/$activevm/s/ \+/ /gp" | head -n1 | cut -f 5 -d ' ' | sed -e 's/,/./g' -e 's/.$//' | awk '{print int($1+0.5)}')G
VMActive=$(virsh list | grep $1 | wc -l)
echo "Sauvegarde de $activevm, localvmsource=$localvmsourc$localvmsource, lvmsize=$lvmsize, VMActive=$VMActive"
echo "sur $remote remotevmdest=$remotevmdest"
if [ "$VMActive" -gt 0 ]
then
virsh shutdown $activevm
while [ "$VMActive" -gt 0 ]
do
VMActive=$(virsh list | grep $1 | wc -l)
echo "Waiting shutdown $activevm..."
sleep 5
done
fi
echo "copy de la vm......."
echo "dd bs=4M if=$localvmsource | pv -s $lvmsize | dd of=$localvmsource.backup"
dd bs=4M if=$localvmsource | pv -s $lvmsize | dd of=$localvmsource.backup
echo "."
echo "Restart VM : $activevm"
virsh start $activevm
echo "."
echo "virsh list --all"
virsh list --all
echo "."
echo "Copy lvm to bzip2..."
echo "dd if=/dev/lvm-kvm/$activevm.backup | pv -s $lvmsize | bzip2 -cf | dd of=$targetpath/$activevm.bz2 conv=noerror"
dd if=/dev/lvm-kvm/$activevm.backup | pv -s $lvmsize | bzip2 -cf | dd of=$targetpath/$activevm.bz2 conv=noerror
echo "."
if ping -c 1 $remote &> /dev/null # copy on remote if active/exist
then
echo "Copy sur $remote"
echo "dd if=$localvmsource bs=512K | pv -s $lvmsize | ssh root@$remote 'dd bs=512K of=$remotevmdest' "
sleep 2;
dd if=$localvmsource bs=512K | pv -s $lvmsize | ssh root@$remote "dd bs=512K of=$remotevmdest"
fi
#--------------------------------------------------------------------------------------------------------------------------------------------
# problème de perfs dans une VM KVM
ethtool -K [interface] gro off tso off
#----------------------------------------------------------------
dd if=/dev/Volume01/Disk of=/tmp/image.raw
qemu-img convert -O vdi /tmp/image.raw test.vdi
rm /tmp/image.raw
#--------------------- # change @MAC
virsh edit
# Copy VM script bash
#--------------------------------------------------------------------------------------------------------------------------------------------
#!/bin/bash
activevm="$1"
targetpath=/home/kvm
remote=edouard
localvmsource=$(virsh dumpxml $activevm | grep 'source dev=' | cut -d "'" -f2)
remotevmd=$(ssh root@$remote "virsh dumpxml $activevm | grep 'source dev=' ")
remotevmdest=$(echo "$remotevmd" | grep 'source dev=' | cut -d "'" -f2)
lvmsize=$(lvs | sed -n "/$activevm/s/ \+/ /gp" | head -n1 | cut -f 5 -d ' ' | sed -e 's/,/./g' -e 's/.$//' | awk '{print int($1+0.5)}')G
VMActive=$(virsh list | grep $1 | wc -l)
echo "Sauvegarde de $activevm, localvmsource=$localvmsourc$localvmsource, lvmsize=$lvmsize, VMActive=$VMActive"
echo "sur $remote remotevmdest=$remotevmdest"
if [ "$VMActive" -gt 0 ]
then
virsh shutdown $activevm
while [ "$VMActive" -gt 0 ]
do
VMActive=$(virsh list | grep $1 | wc -l)
echo "Waiting shutdown $activevm..."
sleep 5
done
fi
echo "copy de la vm......."
echo "dd bs=4M if=$localvmsource | pv -s $lvmsize | dd of=$localvmsource.backup"
dd bs=4M if=$localvmsource | pv -s $lvmsize | dd of=$localvmsource.backup
echo "."
echo "Restart VM : $activevm"
virsh start $activevm
echo "."
echo "virsh list --all"
virsh list --all
echo "."
echo "Copy lvm to bzip2..."
echo "dd if=/dev/lvm-kvm/$activevm.backup | pv -s $lvmsize | bzip2 -cf | dd of=$targetpath/$activevm.bz2 conv=noerror"
dd if=/dev/lvm-kvm/$activevm.backup | pv -s $lvmsize | bzip2 -cf | dd of=$targetpath/$activevm.bz2 conv=noerror
echo "."
if ping -c 1 $remote &> /dev/null # copy on remote if active/exist
then
echo "Copy sur $remote"
echo "dd if=$localvmsource bs=512K | pv -s $lvmsize | ssh root@$remote 'dd bs=512K of=$remotevmdest' "
sleep 2;
dd if=$localvmsource bs=512K | pv -s $lvmsize | ssh root@$remote "dd bs=512K of=$remotevmdest"
fi
#--------------------------------------------------------------------------------------------------------------------------------------------
# problème de perfs dans une VM KVM
ethtool -K [interface] gro off tso off
vendredi 21 mars 2014
Apache secure ssl
# see recent
http://sadar-ssi.blogspot.fr/2014/11/debian-7-apache-2222-patch-proxy-ssh.html
# secure apache2 source https://www.argure.nl/index.php/forward-secrecy-in-apache-on-debian-wheezy-or-how-to-ace-the-ssltest-with-a-perfect-100/
#-------------------------------------------------------------------------------------
Once you’ve got your certificate installed (or while waiting for one), lets get to configuring apache2, starting with the default ssl configuration:
# cd /etc/apache2
# nano mods-available/ssl.conf
Find this line on line 60:
SSLCipherSuite HIGH:MEDIUM:!aNULL:!MD5
Replace it with:
SSLCipherSuite AES256+EECDH:AES256+EDH:!aNULL
Find this line on line 73:
#SSLHonorCipherOrder On
Uncomment it:
SSLHonorCipherOrder On
Find this line on line 78:
SSLProtocol all
Replace it with:
SSLProtocol all -SSLv3
If you plan to run multiple virtual hosts on the same IP address (for instance, hosting both example.tld and anotherexample.tld on the same ivp4), find this line on line 86:
#SSLStrictSNIVHostCheck On
And uncomment it:
SSLStrictSNIVHostCheck On
Next up, if you place files in /srv like I do, we need to allow access:
# nano apache2.conf
Find this block on line 170:
#
# Options Indexes FollowSymLinks
# AllowOverride None
# Require all granted
#
And uncomment it:
Options Indexes FollowSymLinks
AllowOverride None
Require all granted
By default apache2 sends inode info in the etag headers. This is a potential security flaw, so lets remove them:
# nano conf-available/etag.conf
And add:
FileETag MTime Size
Next up, if your Certificate Authority uses intermediate certs, apache2 needs to know about them so they can be sent to the client. Some CA’s have a chain of intermediate certs, in which case you need to concatenate them in a single .pem file. You should not include the root CA, as this causes additional overhead and is useless, since those certificates should sit on the client machine.
Some CA’s (like StartSSL), have also started offering certificates using the SHA-2 algorithm rather than SHA-1 which should be avoided. SHA-512 is ideal in my opinion, but SHA-256 is also good and is much more common. The alternatives like SHA-384 and SHA-224 are very rare.
I personally use StartSSL with Class 2 validation and that is what will be assumed. Your certificate authority likely has a guide on where to find the intermediate certificates.
#Get the intermediate certificate:
cd /etc/ssl/localcerts
wget https://startssl.com/certs/class2/sha2/pem/sub.class2.server.sha2.ca.pem
#Now lets include the intermediate certificate, along with some other configuration directives for mod_ssl.
cd /etc/apache2
nano conf-available/ssl-custom.conf
#Add the following line:
SSLCertificateChainFile /etc/ssl/localcerts/sub.class2.server.sha2.ca.pem
#apache2 now also supports OCSP stapling, which is a good thing since it reduces tcp overhead, and also protects the #client’s privacy as it doesn’t send requests to your CA, so lets add these lines as well:
SSLUseStapling On
SSLStaplingCache "shmcb:/cache/stapling_cache(128000)"
(Note, OCSP stapling won’t actually work if your CA uses an intermediate certificate like with StartSSL, but it is a good idea to enable regardless as increased deployment will lead to further development of this method.)
Earlier we patched apache2 and generated a custom DH pool, so let’s include that as well by adding:
SSLDHParametersFile /etc/ssl/dh4096.pem
Some browsers (*cough IE*) have not followed standards for a long time and keeps an SSL session open longer than is needed, which increases server load, so lets stop that behaviour by adding these lines:
BrowserMatch "MSIE [2-6]" nokeepalive ssl-unclean-shutdown downgrade-1.0 force-response-1.0
BrowserMatch "MSIE [17-9]" ssl-unclean-shutdown
Finally, if you rewrite plain HTTP to HTTPS (and I recommend this, and is assumed later), you will want to send a HSTS header to clients. This tells a client to always use HTTPS for requests to your server, and not even try HTTP. This is faster for the client, and reduces load on your server somewhat. Do this by adding:
Header always set Strict-Transport-Security "max-age=31536000; includeSubDomains"
Close and save ssl-custom.conf. There are also some small security tweaks which are in apache2 but are disabled by default. Luckily, they are easily enabled:
nano conf-available/security.conf
First, take a look at this block, starting at line 55:
#
# Require all denied
#
If you use subversion to manage your websites, uncomment that block. I personally use git, so I uncommented it and changed ‘svn’ to ‘git’, resulting in:
Require all denied
Next, find this line on line 64:
#Header set X-Content-Type-Options: "nosniff"
Uncomment it:
Header set X-Content-Type-Options: "nosniff"
And this line on line 71:
#Header set X-Frame-Options: "sameorigin"
Uncomment that one as well:
Header set X-Frame-Options: "sameorigin"
Lastly, this header was present in apache2.2 but was removed in 2.4 for a reason I don’t know about. It tells the XSS filter in modern browsers to completely block access to a page if it detects a cross site scripting attack. I personally like to add it:
Header set X-XSS-Protection: "1; mode=block"
#Close and save. Next, we will need to enable the modules
a2enmod ssl headers
#And enable the configurations we just made:
a2enconf etag.conf ssl-custom.conf
# proxy modules
a2enmod proxy_connect proxy_http proxy_html mod_auth_digest proxy_wstunnel.load rewrite.load xml2enc.load
#Disable the ‘default’ site:
a2dissite 000-default
Create dir for virtualhost
mkdir -p /var/log/apache2/sadar /srv/sadar
touch /var/log/apache2/sadar/access.log /var/log/apache2/sadar/error.log
chown -R root:adm /var/log/apache2/sadar
touch /srv/sadar/index.html
chown -R www-data:www-data /srv/sadar
Next up, lets make a configuration
nano /etc/apache2/sites-available/sadar.conf
#----------------------------------------------------------------------------- sadar.conf -------------------------------------
ServerName sadar
ServerAdmin sadar@sadar-ssi.org
Redirect permanent / https://sadar/
HostnameLookups On
ServerName sadar
ServerAdmin sadar@sadar-ssi.org
ServerSignature off
DocumentRoot /srv/sadar
LogLevel info ssl:warn
ErrorLog ${APACHE_LOG_DIR}/sadar/error.log
CustomLog ${APACHE_LOG_DIR}/sadar/access.log combined
SSLEngine on
SSLproxyengine on
SSLCertificateFile /etc/ssl/localcerts/sadar-certificate.crt
SSLCertificateKeyFile /etc/ssl/localcerts/sadar-certificate.key
SSLVerifyClient none
Options FollowSymLinks
AllowOverride None
Options Indexes FollowSymLinks MultiViews
AllowOverride None
Order allow,deny
allow from all
HostnameLookups On
Proxyrequests On
ProxyVia full
AllowCONNECT 22
Order deny,allow
Deny from all
Order deny,allow
Allow from all
# vim: syntax=apache ts=4 sw=4 sts=4 sr noet
#---------------------------------------------------------------------------- sadar.conf -------------------------------------
# activate site
a2ensite sadar
#restart apache
service apache2 restart
# into ./ssh/config
Host my-remote-ssh
Hostname my-host-ssh
Port 22
DynamicForward *:11999
IdentityFile ./private-keys/remote-ssh.ppk
ProxyCommand proxytunnel -v -p my-local-proxy:80 --passfile=proxy/auth -r my-remote-proxy:443 -d %h:%p -H "User-Agent: Yaaaaaaaaa" -X
mardi 4 mars 2014
virtualbox essentials commands
# start vm
VMName=template
vboxheadless --startvm $VMName & sleep 2; tail -f $(cat .config/VirtualBox/VirtualBox.xml|grep "SystemProperties defaultMachineFolder"| cut -d'=' -f2 | cut -d' ' -f1 | sed -e 's/\"//g')/$VMName/Logs/VBox.log | ccze
#poweroff vm
VMName=template
vboxmanage controlvm $VMName poweroff
# list active vm
vboxmanage list runningvms
# list all vm
vboxmanage list vms
# change nic bridget to nat
VMName=template
vboxmanage modifyvm $VMName --nic1 nat ; vboxmanage showvminfo $VMName| grep -i nic
vboxmanage controlvm $VMName nic1 nat ; vboxmanage showvminfo $VMName| grep -i nic
# add port forwarding rule
VMName=template
vboxmanage modifyvm $VMName --natpf1 "ssh,tcp,127.0.0.1,2222,,22" ; vboxmanage showvminfo $VMName| grep -i nic
vboxmanage controlvm $VMName natpf1 "ssh,tcp,127.0.0.1,2222,,22" ; vboxmanage showvminfo $VMName| grep -i nic
#------ change UUID don't work !!! --------------------------------------------------------------
# list hdd
vboxmanage list hdds
# show vm info
vboxmanage showvminfo my-vm --details
# show hd info
vboxmanage showhdinfo /path-to-vm/my-vm.vdi
# detach controler
vboxmanage storageattach my-vm --storagectl "SATA" --port 0 --device 0 --medium none
#close medim disk
vboxmanage closemedium disk /path-to-vm/my-vm.vdi
# reattach the disk
vboxmanage storageattach my-vm --storagectl "SATA" --port 0 --device 0 --type hdd --medium /path-to-vm/my-vm.vdi
VMName=my-vm
VMNameDiskPath=/path-to-vm/disk.vdi
vboxmanage storageattach $VMName --storagectl "SATA" --port 0 --device 0 --medium none
vboxmanage closemedium disk $VMNameDiskPath
vboxmanage storageattach $VMName --storagectl "SATA" --port 0 --device 0 --type hdd --medium $VMNameDiskPath
# Nat forwarding tunnelling dynamic port
#----------------------------------------- ./.ssh/config
Host *
ForwardX11 yes
KeepAlive yes
ServerAliveInterval 15
ServerAliveCountMax 3
Host homvdsk
Hostname myhostname.com
Port 443
ProxyCommand /usr/bin/corkscrew myproxy 80 %h %p ~/.ssh/auth
DynamicForward *:10998
vboxmanage controlvm $VMName natpf1 "proxy,tcp,,10999,,10998" ; vboxmanage showvminfo $VMName| grep -i nic
# delete port forwarding rule
VMName=template
vboxmanage modifyvm $VMName --natpf1 delete ssh ; vboxmanage showvminfo $VMName| grep -i nic
vboxmanage controlvm $VMName natpf1 delete ssh ; vboxmanage showvminfo $VMName| grep -i nic
# clone vm
VMSource=template
VMTarget=clonedvm
vboxmanage clonevm $VMSource --name $VMTarget --register --mode all ; vboxmanage list vms
# delete vm (all files)
VMName=template
vboxmanage unregistervm $VMName --delete
# use lvm volume
VBoxManage internalcommands createrawvmdk -filename /path/to/file.vmdk -rawdisk /dev/volumegroup/logicalvolume
VMName=template
vboxheadless --startvm $VMName & sleep 2; tail -f $(cat .config/VirtualBox/VirtualBox.xml|grep "SystemProperties defaultMachineFolder"| cut -d'=' -f2 | cut -d' ' -f1 | sed -e 's/\"//g')/$VMName/Logs/VBox.log | ccze
#poweroff vm
VMName=template
vboxmanage controlvm $VMName poweroff
# list active vm
vboxmanage list runningvms
# list all vm
vboxmanage list vms
# change nic bridget to nat
VMName=template
vboxmanage modifyvm $VMName --nic1 nat ; vboxmanage showvminfo $VMName| grep -i nic
vboxmanage controlvm $VMName nic1 nat ; vboxmanage showvminfo $VMName| grep -i nic
# add port forwarding rule
VMName=template
vboxmanage modifyvm $VMName --natpf1 "ssh,tcp,127.0.0.1,2222,,22" ; vboxmanage showvminfo $VMName| grep -i nic
vboxmanage controlvm $VMName natpf1 "ssh,tcp,127.0.0.1,2222,,22" ; vboxmanage showvminfo $VMName| grep -i nic
#------ change UUID don't work !!! --------------------------------------------------------------
# list hdd
vboxmanage list hdds
# show vm info
vboxmanage showvminfo my-vm --details
# show hd info
vboxmanage showhdinfo /path-to-vm/my-vm.vdi
# detach controler
vboxmanage storageattach my-vm --storagectl "SATA" --port 0 --device 0 --medium none
#close medim disk
vboxmanage closemedium disk /path-to-vm/my-vm.vdi
# reattach the disk
vboxmanage storageattach my-vm --storagectl "SATA" --port 0 --device 0 --type hdd --medium /path-to-vm/my-vm.vdi
VMName=my-vm
VMNameDiskPath=/path-to-vm/disk.vdi
vboxmanage storageattach $VMName --storagectl "SATA" --port 0 --device 0 --medium none
vboxmanage closemedium disk $VMNameDiskPath
vboxmanage storageattach $VMName --storagectl "SATA" --port 0 --device 0 --type hdd --medium $VMNameDiskPath
# Nat forwarding tunnelling dynamic port
#----------------------------------------- ./.ssh/config
Host *
ForwardX11 yes
KeepAlive yes
ServerAliveInterval 15
ServerAliveCountMax 3
Host homvdsk
Hostname myhostname.com
Port 443
ProxyCommand /usr/bin/corkscrew myproxy 80 %h %p ~/.ssh/auth
DynamicForward *:10998
vboxmanage controlvm $VMName natpf1 "proxy,tcp,,10999,,10998" ; vboxmanage showvminfo $VMName| grep -i nic
# delete port forwarding rule
VMName=template
vboxmanage modifyvm $VMName --natpf1 delete ssh ; vboxmanage showvminfo $VMName| grep -i nic
vboxmanage controlvm $VMName natpf1 delete ssh ; vboxmanage showvminfo $VMName| grep -i nic
# clone vm
VMSource=template
VMTarget=clonedvm
vboxmanage clonevm $VMSource --name $VMTarget --register --mode all ; vboxmanage list vms
# delete vm (all files)
VMName=template
vboxmanage unregistervm $VMName --delete
# use lvm volume
VBoxManage internalcommands createrawvmdk -filename /path/to/file.vmdk -rawdisk /dev/volumegroup/logicalvolume
vendredi 31 janvier 2014
NFS export & error read-only error on client
# For example /etc/export
/mnt/vol01 192.168.1.0/24(ro,sync,no_subtree_check)
/mnt/vol01/dir1 192.168.1.0/24(ro,sync,no_subtree_check)
/mnt/vol01/inet/btorrent 192.168.1.0/24(rw,sync,no_subtree_check,all_squash)
/mnt/vol01/dir1/dir2 torrenthost(rw,sync,no_subtree_check,all_squash)
# mount torrenthost
mount -t nfs nfsserver:/mnt/vol01/inet/btorrent /mnt/share.nfs/btorrent
mount -t nfs nfsserver:/mnt/vol01/dir1/dir2 /mnt/share.nfs/dir2
touch /mnt/share.nfs/dir2/xx --> read-only...;-//
# Change /etc/export
/mnt/vol01 192.168.1.0/24(ro,sync,no_subtree_check,fsid=0)
/mnt/vol01/dir1 192.168.1.0/24(ro,sync,no_subtree_check,fsid=1)
/mnt/vol01/inet/btorrent 192.168.1.0/24(rw,sync,no_subtree_check,all_squash,fsid=2)
/mnt/vol01/dir1/dir2 torrenthost(rw,sync,no_subtree_check,all_squash,fsid=3)
et voilà !!!
mardi 28 janvier 2014
perl CPAN
#cpan prerequis
aptitude install build-essential libterm-readline-gnu-perl
#cpan mini
cpan install Bundle::CPAN
#Install all dependencies
o conf prerequisites_policy follow
o conf commit
aptitude install build-essential libterm-readline-gnu-perl
#cpan mini
cpan install Bundle::CPAN
#Install all dependencies
o conf prerequisites_policy follow
o conf commit
mardi 21 janvier 2014
ssh tunneling, rebond, proxytunnel, reverse proxy, rdp tunneling
# ssh over https via proxy see
http://sadar-ssi.blogspot.fr/2014/11/debian-7-apache-2222-patch-proxy-ssh.html
# accès ssh via proxy http sortant proxy https entrant (merci https !! ;-))
# ssh access through outcoming http proxy --> incoming https proxy (Thx https !! ;-))
export PrxyServ=name or ip server proxy
export PrxyPort =port server http
ssh user@targetsrv -o 'ProxyCommand=proxytunnel -z --proxy=$PrxyServ:$PrxyPort --remproxy=remote-proxy-server-address:443 --dest=%h:%p -X'
# accès RDP via un tunnel ssh par un proxy http sortant et proxy https entrant
# ssh tunnel RDP through outcoming http proxy --> incoming https proxy
ssh -v -NL 2222:localhost:2222 user@linuxserver -o 'ProxyCommand=proxytunnel -z --proxy=$PrxyServ:$PrxyPort --remproxy=remote-proxy-server-address:443 --dest=%h:%p -X' 'ssh -v -fNL 2222:@ip_windows:3389 linuxserver'
# Depuis une ligne de commande windows
mstsc /span /admin /noconsentprompt /v:localhost:2222
# X11 forwarding via un tunnel ssh, proxy http sortant et proxy https entrant
# X11 forwarding through ssh tunneling outcoming http proxy --> incoming https proxy
# set env
export DISPLAY=localhost:0.0
export PrxyServ=name or ip server proxy
export PrxyPort =port server http
ssh -Y user@targetsrv -o 'ProxyCommand=proxytunnel -z --proxy=$PrxyServ:$PrxyPort --remproxy=remote-proxy-server-address:443 --dest=%h:%p -X'
#
#-------------------------------- VNC ----------------------------------------------------------------
# installer le serveur vnc (celui qui fonctionne hein !)
aptitude install x11vnc
# si le serveur X11vnc n'est pas lancé en tant que deamon, il faudra au préalable se connecter sur le serveur en ssh pour
# 1 - voir les process qui fonctionnent pour récupérer les paramètres derrière le "-auth"
ps wwwwaux | grep -v grep | grep auth
root 1167 0.4 2.2 358532 69440 tty7 Ssl+ août27 6:02 /usr/bin/X -core :0 -seat seat0 -auth /var/run/lightdm/root/:0 -nolisten tcp vt7 -novtswitch
loli 2310 0.0 0.4 341996 12764 ? Sl août27 0:00 /usr/lib/policykit-1-gnome/polkit-gnome-authentication-agent-1
# 2- puis sur le poste distant, lancer le process x11vnc avec les paramètres suivants
x11vnc -geometry 1024x768 -ncache 10 -localhost -display :0 -auth /var/run/lightdm/root/:0 -o /var/log/x11vnc.log -repeat -norc -forever -shared
# puis établir (si ce n'est fait) via une connexion
ssh -N -C -L 5900:pc-vnc:5900 mysrv
# depuis la vm lancer
vncviewer 127.0.0.1:5900
#-------------------------------- rsync via proxy socks ----------------------------------------------
# 1) établir la connexion vers le serveur distant en montant un port dynamique...
ssh -D*:10998 jessievdsk
# 2)
rsync --ignore-errors --force --human-readable --progress --partial --bwlimit=80 -hav /mnt/share/jessie -e "ssh -o 'ProxyCommand nc -x localhost:10998 rmtsrv 22'" root@rmtsvr:/mnt/vol3To/virtualbox/disk/jessie
#-----------------------------------------------------------------------------------------------------
# Authentification par clef publique / clef privé
# dans /etc/ssh/sshd_config
# vérifier les valeurs suivantes PubkeyAuthentication yes et RSAAuthentication yes
# et changer PasswordAuthentication yes par PasswordAuthentication no
#change hostname
nano /etc/hostname
#change hostname
hostname -F /etc/hostname
# How to generate new host keys on an existing server (duplicate a vm for example)
rm -rf /etc/ssh/ssh_host_*
ssh-keygen -A
dpkg-reconfigure openssh-server
service ssh restart
#To change the passphrase on your default DSA key:
ssh-keygen -p -f /root/olwen/private.04.ppk
#-------------------------------- Flush DNS W7 -------------------------------------------------------
# Flush DNS W7
ipconfig /flushdns
http://sadar-ssi.blogspot.fr/2014/11/debian-7-apache-2222-patch-proxy-ssh.html
# accès ssh via proxy http sortant proxy https entrant (merci https !! ;-))
# ssh access through outcoming http proxy --> incoming https proxy (Thx https !! ;-))
export PrxyServ=name or ip server proxy
export PrxyPort =port server http
ssh user@targetsrv -o 'ProxyCommand=proxytunnel -z --proxy=$PrxyServ:$PrxyPort --remproxy=remote-proxy-server-address:443 --dest=%h:%p -X'
# accès RDP via un tunnel ssh par un proxy http sortant et proxy https entrant
# ssh tunnel RDP through outcoming http proxy --> incoming https proxy
ssh -v -NL 2222:localhost:2222 user@linuxserver -o 'ProxyCommand=proxytunnel -z --proxy=$PrxyServ:$PrxyPort --remproxy=remote-proxy-server-address:443 --dest=%h:%p -X' 'ssh -v -fNL 2222:@ip_windows:3389 linuxserver'
# Depuis une ligne de commande windows
mstsc /span /admin /noconsentprompt /v:localhost:2222
# et hop !
# X11 forwarding via un tunnel ssh, proxy http sortant et proxy https entrant
# X11 forwarding through ssh tunneling outcoming http proxy --> incoming https proxy
# set env
export DISPLAY=localhost:0.0
export PrxyServ=name or ip server proxy
export PrxyPort =port server http
ssh -Y user@targetsrv -o 'ProxyCommand=proxytunnel -z --proxy=$PrxyServ:$PrxyPort --remproxy=remote-proxy-server-address:443 --dest=%h:%p -X'
#
#-------------------------------- VNC ----------------------------------------------------------------
# installer le serveur vnc (celui qui fonctionne hein !)
aptitude install x11vnc
# si le serveur X11vnc n'est pas lancé en tant que deamon, il faudra au préalable se connecter sur le serveur en ssh pour
# 1 - voir les process qui fonctionnent pour récupérer les paramètres derrière le "-auth"
ps wwwwaux | grep -v grep | grep auth
root 1167 0.4 2.2 358532 69440 tty7 Ssl+ août27 6:02 /usr/bin/X -core :0 -seat seat0 -auth /var/run/lightdm/root/:0 -nolisten tcp vt7 -novtswitch
loli 2310 0.0 0.4 341996 12764 ? Sl août27 0:00 /usr/lib/policykit-1-gnome/polkit-gnome-authentication-agent-1
# 2- puis sur le poste distant, lancer le process x11vnc avec les paramètres suivants
x11vnc -geometry 1024x768 -ncache 10 -localhost -display :0 -auth /var/run/lightdm/root/:0 -o /var/log/x11vnc.log -repeat -norc -forever -shared
# puis établir (si ce n'est fait) via une connexion
ssh -N -C -L 5900:pc-vnc:5900 mysrv
# depuis la vm lancer
vncviewer 127.0.0.1:5900
#-------------------------------- rsync via proxy socks ----------------------------------------------
# 1) établir la connexion vers le serveur distant en montant un port dynamique...
ssh -D*:10998 jessievdsk
# 2)
rsync --ignore-errors --force --human-readable --progress --partial --bwlimit=80 -hav /mnt/share/jessie -e "ssh -o 'ProxyCommand nc -x localhost:10998 rmtsrv 22'" root@rmtsvr:/mnt/vol3To/virtualbox/disk/jessie
#-----------------------------------------------------------------------------------------------------
# Authentification par clef publique / clef privé
# dans /etc/ssh/sshd_config
# vérifier les valeurs suivantes PubkeyAuthentication yes et RSAAuthentication yes
# et changer PasswordAuthentication yes par PasswordAuthentication no
#change hostname
nano /etc/hostname
#change hostname
hostname -F /etc/hostname
# How to generate new host keys on an existing server (duplicate a vm for example)
rm -rf /etc/ssh/ssh_host_*
ssh-keygen -A
dpkg-reconfigure openssh-server
service ssh restart
#To change the passphrase on your default DSA key:
ssh-keygen -p -f /root/olwen/private.04.ppk
#-------------------------------- Flush DNS W7 -------------------------------------------------------
# Flush DNS W7
ipconfig /flushdns
samedi 18 janvier 2014
idle3-tools
aptitude install idle3-tools smartmontools gsmartcontrol
#consultation
idle3ctl -d /dev/sda /dev/sdb
#disable timer
idle3ctl -g /dev/sda /dev/sdb
#consultation
idle3ctl -d /dev/sda /dev/sdb
#disable timer
idle3ctl -g /dev/sda /dev/sdb
KVM / libvirt
# verifier si processur compatible...
egrep -c '(vmx|svm)' /proc/cpuinfo
# installer les packages coté serveur
aptitude install kvm qemu-kvm libvirt-bin virtinst colord bridge-utils virt-manager
#---creating bridge https://wiki.debian.org/BridgeNetworkConnections
#First step to creating the bridge network
brctl addbr br0
# The name br0 is totally up to you, this is just an example name that I’ve chosen for the wiki article.
# Anyway, now that you have your bridge device, you have to add the interfaces that are gonna be bridged. You # can cross-check the enumeration of your ethernet devices with (eth0, eth1, etc. is common):
ip addr show
#Add both the interface with the second computer, and the interface that leads to the existing network. Do it #with this command:
brctl addif br0 eth0
# Configuring bridging in /etc/network/interfaces
# The loopback network interface
auto lo
iface lo inet loopback
auto br0
iface br0 inet static
bridge_ports eth0
address 192.168.1.3
netmask 255.255.255.0
gateway 192.168.1.254
dns-nameservers 192.168.1.1
dns-search home.lan
bridge_fd 9
bridge_hello 2
bridge_maxage 12
bridge_stp off
#------------------------------------------------------
# create bridge
#!/bin/bash
#----------
cd /etc/libvirt/qemu/networks
echo '' > /etc/libvirt/qemu/networks/bridge.xml
echo 'bridge ' >> /etc/libvirt/qemu/networks/bridge.xml
echo '' >> /etc/libvirt/qemu/networks/bridge.xml
echo '' >> /etc/libvirt/qemu/networks/bridge.xml
echo ' ' >> /etc/libvirt/qemu/networks/bridge.xml
virsh net-define bridge.xml
systemctl restart libvirtd.service; systemctl status libvirtd.service
#pol-edit defaut
nano -w /etc/libvirt/storage/default.xml
service libvirt-bin restart
#Changing the libvirt-guests service parameters to allow for the graceful shutdown of guests
# source https://access.redhat.com/site/documentation/en-US/Red_Hat_Enterprise_Linux/6/html/Virtualization_Administration_Guide/sect-gracefully-shut-down-guests-libvirt.html
nano /etc/default/libvirt-guests
# Number of seconds we're willing to wait for a guest to shut down. If parallel
# shutdown is enabled, this timeout applies as a timeout for shutting down all
# guests on a single URI defined in the variable URIS. If this is 0, then there
# is no time out (use with caution, as guests might not respond to a shutdown
# request). The default value is 300 seconds (5 minutes).
SHUTDOWN_TIMEOUT=45
#ou
#howto fix default storage pool location for virt-manager (and libvirt)
virsh
pool-destroy default
pool-undefine default
pool-define-as --name default --type dir --target /storage/local/images
pool-autostart default
pool-build default
pool-start default
pool-destroy local
pool-undefine local
pool-define-as --name local-iso --type dir --target /storage/local/iso
pool-autostart local-iso
pool-build local-iso
pool-start local-iso
quit
#virsh editor (bashrc)
EDITOR=/usr/bin/nano
export EDITOR
http://wiki.deimos.fr/KVM_:_Mise_en_place_de_KVM#System_performances
/etc/rc.local
# KSM
echo 1 > /sys/kernel/mm/ksm/run
/etc/sysctl.conf
# Swapiness
vm.swappiness = 0
#For security and performances issues, you should disable ipv6
#on bridged interfaces by adding those 3 lines :
net.bridge.bridge-nf-call-ip6tables = 0
net.bridge.bridge-nf-call-iptables = 0
net.bridge.bridge-nf-call-arptables = 0
#If you want to always enable VirtIO, to get maximum performances, load those modules :
/etc/modules
virtio_blk
virtio_pci
virtio_net
#provisionner une VM debian
iso=/path-to-iso/debian-7.3.0-amd64-netinst.iso
path=/mnt/vol1To/vm
name=testing
virt-install --ram=256 --name=$name --disk path=$path/$name/$name.img,bus=virtio,size=4 --cdrom=$iso --hvm --vnc --noautoconsole --accelerate --network=bridge:br0,model=virtio
# Detacher l'image ISO
#provisionner W7
iso=/mnt/leonard/vol3To/08000.distrib/zz_os.softs/msw/Microsoft/PlateForms/Windows.7/distrib/W7.Ultimate.64.sp1.iso
virt-install --ram=2024 --name=W7 --disk path=/mnt/vm/kvm/W7/W7.img,bus=virtio,size=4 -cdrom=$iso --hvm --vnc --noautoconsole --os-type windows --os-variant win7 --accelerate
#cloner une VM
virt-clone --original=testing --auto-clone
#voir les VM
virsh list --all
#répertoire contenant les confs
/etc/libvirt/qemu
# problème de perf dans une VM...
ethtool -K [interface] gro off tso off
LVM KVM to Virtualbox
#----------------------------------------------------------------
egrep -c '(vmx|svm)' /proc/cpuinfo
# installer les packages coté serveur
aptitude install kvm qemu-kvm libvirt-bin virtinst colord bridge-utils virt-manager
#---creating bridge https://wiki.debian.org/BridgeNetworkConnections
#First step to creating the bridge network
brctl addbr br0
# The name br0 is totally up to you, this is just an example name that I’ve chosen for the wiki article.
# Anyway, now that you have your bridge device, you have to add the interfaces that are gonna be bridged. You # can cross-check the enumeration of your ethernet devices with (eth0, eth1, etc. is common):
ip addr show
#Add both the interface with the second computer, and the interface that leads to the existing network. Do it #with this command:
brctl addif br0 eth0
# Configuring bridging in /etc/network/interfaces
# The loopback network interface
auto lo
iface lo inet loopback
auto br0
iface br0 inet static
bridge_ports eth0
address 192.168.1.3
netmask 255.255.255.0
gateway 192.168.1.254
dns-nameservers 192.168.1.1
dns-search home.lan
bridge_fd 9
bridge_hello 2
bridge_maxage 12
bridge_stp off
#------------------------------------------------------
# create bridge
#!/bin/bash
#----------
cd /etc/libvirt/qemu/networks
echo '
echo '
echo '
echo '
echo '
virsh net-define bridge.xml
systemctl restart libvirtd.service; systemctl status libvirtd.service
#pol-edit defaut
nano -w /etc/libvirt/storage/default.xml
service libvirt-bin restart
#Changing the libvirt-guests service parameters to allow for the graceful shutdown of guests
# source https://access.redhat.com/site/documentation/en-US/Red_Hat_Enterprise_Linux/6/html/Virtualization_Administration_Guide/sect-gracefully-shut-down-guests-libvirt.html
nano /etc/default/libvirt-guests
# Number of seconds we're willing to wait for a guest to shut down. If parallel
# shutdown is enabled, this timeout applies as a timeout for shutting down all
# guests on a single URI defined in the variable URIS. If this is 0, then there
# is no time out (use with caution, as guests might not respond to a shutdown
# request). The default value is 300 seconds (5 minutes).
SHUTDOWN_TIMEOUT=45
#ou
#howto fix default storage pool location for virt-manager (and libvirt)
virsh
pool-destroy default
pool-undefine default
pool-define-as --name default --type dir --target /storage/local/images
pool-autostart default
pool-build default
pool-start default
pool-destroy local
pool-undefine local
pool-define-as --name local-iso --type dir --target /storage/local/iso
pool-autostart local-iso
pool-build local-iso
pool-start local-iso
quit
#virsh editor (bashrc)
EDITOR=/usr/bin/nano
export EDITOR
http://wiki.deimos.fr/KVM_:_Mise_en_place_de_KVM#System_performances
/etc/rc.local
# KSM
echo 1 > /sys/kernel/mm/ksm/run
/etc/sysctl.conf
# Swapiness
vm.swappiness = 0
#For security and performances issues, you should disable ipv6
#on bridged interfaces by adding those 3 lines :
net.bridge.bridge-nf-call-ip6tables = 0
net.bridge.bridge-nf-call-iptables = 0
net.bridge.bridge-nf-call-arptables = 0
#If you want to always enable VirtIO, to get maximum performances, load those modules :
/etc/modules
virtio_blk
virtio_pci
virtio_net
#provisionner une VM debian
iso=/path-to-iso/debian-7.3.0-amd64-netinst.iso
path=/mnt/vol1To/vm
name=testing
virt-install --ram=256 --name=$name --disk path=$path/$name/$name.img,bus=virtio,size=4 --cdrom=$iso --hvm --vnc --noautoconsole --accelerate --network=bridge:br0,model=virtio
# Detacher l'image ISO
#provisionner W7
iso=/mnt/leonard/vol3To/08000.distrib/zz_os.softs/msw/Microsoft/PlateForms/Windows.7/distrib/W7.Ultimate.64.sp1.iso
virt-install --ram=2024 --name=W7 --disk path=/mnt/vm/kvm/W7/W7.img,bus=virtio,size=4 -cdrom=$iso --hvm --vnc --noautoconsole --os-type windows --os-variant win7 --accelerate
#cloner une VM
virt-clone --original=testing --auto-clone
#voir les VM
virsh list --all
#répertoire contenant les confs
/etc/libvirt/qemu
# problème de perf dans une VM...
ethtool -K [interface] gro off tso off
LVM KVM to Virtualbox
#----------------------------------------------------------------
dd if=/dev/Volume01/Disk of=/tmp/image.raw
qemu-img convert -O vdi /tmp/image.raw test.vdi
rm /tmp/image.raw
#--------------------- samedi 21 décembre 2013
create usb boot
aptitude install mbr dosfstools mtools syslinux-common
# Pour la version 64 bits
wget http://ftp.debian.org/debian/dists/wheezy/main/installer-amd64/current/images/hd-media/boot.img.gz
# Pour la version 32 bits
wget http://ftp.debian.org/debian/dists/wheezy/main/installer-i386/current/images/hd-media/boot.img.gz
Décompresser là :
gunzip boot.img.gz
Insérer la clé USB destinataire :
veiller à ce qu'elle ne se monte pas automatiquement et la démonter au besoin
repérer le périphérique, par exemple /dev/sdb
Copier bit à bit le bootstrap sur la clé :
dd if=boot.img of=/dev/sdb bs=512
Récupérer la signature MD5 de la clé et du bootstrap pour vérifier :
md5sum /dev/sdb
md5sum boot.img
Monter la clé :
mkdir /tmp/USB
sudo mount /dev/sdb /tmp/USB
Récupérer l'image NetInst en amd64 ou en i386de la Debian
# pour architecture 64 bits
wget http://cdimage.debian.org/debian-cd/7.1.0/amd64/iso-cd/debian-7.1.0-amd64-netinst.iso
# pour architecture 32 bits
wget http://cdimage.debian.org/debian-cd/7.1.0/i386/iso-cd/debian-7.1.0-i386-netinst.iso
La copier sur la clé :
# pour architecture 64 bits
sudo cp debian-7.1.0-amd64-netinst.iso /tmp/USB
# pour architecture 32 bits
sudo cp debian-7.1.0-i386-netinst.iso /tmp/USB
Installer les pilotes non libres BNX2 et BNX2X :
sudo apt-get install firmware-bnx2x firmware-bnx2
Copier les pilotes sur la clé USB :
sudo cp /lib/firmware/bnx* /tmp/USB
Démonter la clé : tout est prêt pour l'installation :
sudo umount /tmp/USB
sinon voir l'excellent outil easy2boot (fin de la prise de tête :-)) tuto sur http://www.lecadelo.fr/easy2boot-une-trousse-a-outils-de-poche/
jeudi 10 octobre 2013
Excel 2003 VBA Project lost password
There is another (somewhat easier) solution, without the size problems. I used this approach today (on a 2003 XLS file, using Excel 2007) and was successful.
Backup the xls file
Using a HEX editor, locate the DPB=... part
Change the DPB=... string to DPx=...
Open the xls file in Excel
Open the VBA editor (ALT+F11)
the magic: Excel discovers an invalid key (DPx) and asks whether you want to continue loading the project (basically ignoring the protection)
You will be able to overwrite the password, so change it to something you can remember
Save the xls file*
Close and reopen the document and work your VBA magic!
*NOTE: Be sure that you have changed the password to a new value, otherwise the next time you open the spreadsheet Excel will report errors (Unexpected Error), then when you access the list of VBA modules you will now see the names of the source modules but receive another error when trying to open forms/code/etc. To remedy this, go back to the VBA Project Properties and set the password to a new value. Save and re-open the Excel document and you should be good to go!
source : http://stackoverflow.com/questions/1026483/is-there-a-way-to-crack-the-password-on-an-excel-vba-project
vendredi 20 septembre 2013
X11 Forwarding Fails When IPv6 is Disabled [Resolved]
So, I put the following lines in remote host’s /etc/ssh/sshd_config file.
$ cat /etc/ssh/sshd_config
………………………………
# Workaround to have X forwarding work when ipv6 is disabled
# http://ubuntuforums.org/showthread.php?t=1649657
AddressFamily inet
$ cat /etc/ssh/sshd_config
………………………………
# Workaround to have X forwarding work when ipv6 is disabled
# http://ubuntuforums.org/showthread.php?t=1649657
AddressFamily inet
dimanche 15 septembre 2013
howto fix default storage pool location for virt-manager (and libvirt)
/usr/bin/virt-manager
pool-destroy default
pool-undefine default
pool-define-as --name default --type dir --target /storage/local/images
pool-autostart default
pool-build default
pool-start default
pool-destroy local
pool-undefine local
pool-define-as --name local-iso --type dir --target /storage/local/iso
pool-autostart local-iso
pool-build local-iso
pool-start local-iso
quit
Cygwin: bash Here
Windows Registry Editor Version 5.00
[HKEY_CLASSES_ROOT\Directory\Background\shell\cmd\command]
@="c:\\cygwin\\bin\\bash.exe --login -i -c \"cd \\\"`cygpath -u '%V'`\\\";bash\""
[HKEY_CLASSES_ROOT\Directory\shell\cmd\command]
@="c:\\cygwin\\bin\\bash.exe --login -i -c \"cd \\\"`cygpath -u '%V'`\\\";bash\""
For those of you who like regedit, here’s the same thing unescaped:
HKEY_CLASSES_ROOT\Directory\Background\shell\cmd\command
c:\cygwin\bin\bash.exe --login -i -c "cd \"`cygpath -u '%V'`\";bash"
HKEY_CLASSES_ROOT\Directory\shell\cmd\command
c:\cygwin\bin\bash.exe --login -i -c "cd \"`cygpath -u '%V'`\";bash"
mardi 27 août 2013
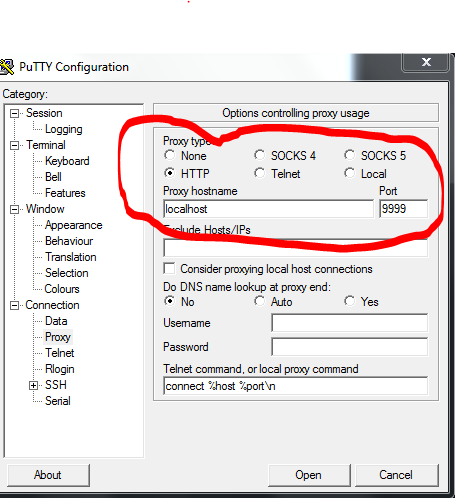
cntlm : windows tools for ssh tunneling over proxy http with putty
#---see http://cntlm.sourceforge.net/
echo cntlm -v -f -s -c "C:\Program Files (x86)\Cntlm\cntlm.ini"
cntlm -v -f -s -c "C:\Program Files (x86)\Cntlm\cntlm.ini"
Generate HashPassword
cntlm -v -u username -d domainename -H
cntlm.ini
Username username
PassNTLMv2 08192805CB06C3214581268F86EEA8
Domain domainename
Proxy proxyname
NoProxy localhost, 127.0.0.*, 10.*, 192.168.*, 172.24.*
Listen 9999
Header User-Agent: Mozilla/4.0 (compatible; MSIE 5.5; Windows 98)
...and use putty --> proxy on 9999
Start FireFox script for FoxyProxy
#cygwin bash ------------------------------------------------------------------------------------------
#!/bin/bash
# xmlstarlet sel -t -m "//foxyproxy/proxies" -m "proxy" -v "@name" -o ":" -v "@id" -n /cygdrive/c/Users/`whoami`/appdata/Roaming/Mozilla/Firefox/profiles/*.default/foxyproxy.xml
SleepTime=5
File="/cygdrive/c/Users/`whoami`/appdata/Roaming/Mozilla/Firefox/profiles/7c1tsms2.default/foxyproxy.xml"
FireFox=/cygdrive/c/Program\ Files\ \(x86\)/Mozilla\ Firefox/firefox.exe
IPWork=10
LocalisationIP=$(ipconfig | grep -i ipv4 | cut -f2 -d':' | cut -f1 -d'.' )
if [ $LocalisationIP -eq $IPWork ]; then
WorkName="Work"
echo Lan Work : $LocalisationIP
else
WorkName="Default"
echo Lan Home : $LocalisationIP
fi
# echo "/usr/bin/xmlstarlet sel -t -m "foxyproxy/proxies/proxy[@name=$WorkName]" -v "@id" -n $File"
ProxyID=$(/usr/bin/xmlstarlet sel -t -m "foxyproxy/proxies/proxy[@name='$WorkName']" -v "@id" -n $File)
cd /cygdrive/c/Program\ Files\ \(x86\)/Mozilla\ Firefox/
echo "cmd /c start 'FireFox' -foxyproxy-mode $ProxyID"
cmd /c start "FireFox" -foxyproxy-mode $ProxyID
while [ -z "${Pid}" ]; do
Pid=$(pslist |grep -i firefox | awk '{print $2}')
echo Firefox starting...
sleep $SleepTime
done
exit
#Dos---------------------------------------------------------------------------------------------------
@cls
@echo off
@Set RsxWork=172
for /f "delims= " ^%%i in ('ipconfig ^| grep -i ipv4 ^| cut -f2 -d':' ^| cut -f1 -d'.' ') do set myip=^%%i
@echo %myip% %RsxWork%
IF "%myip%"=="%RsxWork%" (
@echo Work Network....
start "Firefox" "c:\Program Files (x86)\Mozilla Firefox\firefox.exe" -foxyproxy-mode 1971257625
)
IF NOT "%myip%"=="%RsxWork%" (
@echo Home Network....
start "Firefox" "c:\Program Files (x86)\Mozilla Firefox\firefox.exe" -foxyproxy-mode 2153982398
)
@echo is starting...
Associate .sh bash cygwin
assoc .sh=bashscript
ftype bashscript=D:\cygwin.64\bin\bash.exe --login -i -c 'cd "$(dirname "$(cygpath -u "%1")")"; bash "$(cygpath -u "%1")"'
ftype bashscript=D:\cygwin.64\bin\bash.exe "%1"
ftype bashscript=D:\cygwin.64\bin\bash.exe --login -i -c 'cd "$(dirname "$(cygpath -u "%1")")"; bash "$(cygpath -u "%1")"'
ftype bashscript=D:\cygwin.64\bin\bash.exe "%1"
samedi 6 juillet 2013
raspberry usb read files
aptitude install usbmount
#!/bin/bash

mroot=/media/usb*

#loop infini
while [ 1 -eq 1 ]
  do

   # loop sur les fichiers trouvés sur les montages USB
    for file in `find $mroot -type f  | sort -n`
     do
       echo "file = $file";
       omxplayer $file
     done

done
vendredi 28 juin 2013
Inscription à :
Articles (Atom)